")
How to Troubleshoot Your Garage Door Opener is easier than most homeowners realize—especially if you know the right steps to diagnose common issues safely and efficiently.
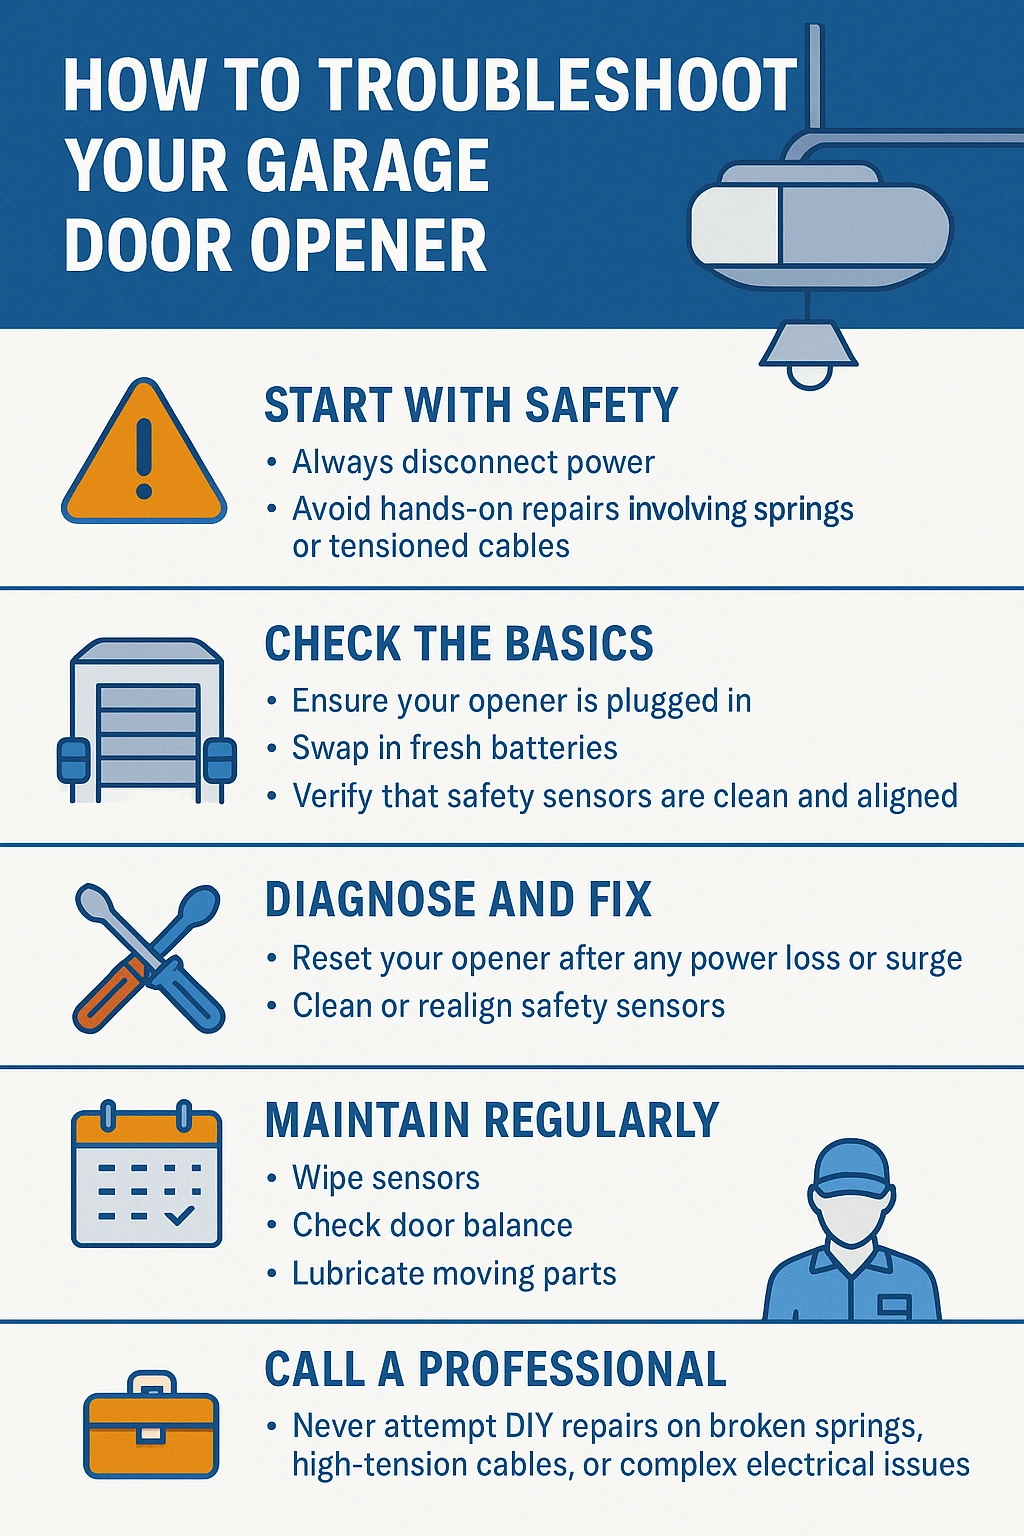
- Start with safety first by always disconnecting power and avoiding hands-on repairs involving springs or tensioned cables—these are jobs for certified professionals.
- Check the basics before calling for service—ensure your opener is plugged in, swap in fresh batteries, and verify that safety sensors are clean and aligned.
- Most door-closing issues stem from dirty or misaligned sensors—a quick wipe and realignment solves nearly 90% of ‘door won’t close’ calls in Cedar Park.
- Reset your opener after any power loss or surge by unplugging for 60 seconds or using the “Learn” button to reprogram remotes and keypads for fast fixes.
- Prevent unexpected breakdowns with monthly maintenance—wipe sensors, check door balance, and lubricate moving parts to reduce issues by up to 70%.
- Never attempt DIY repairs on broken springs, high-tension cables, or complex electrical issues—these repairs risk serious injury and demand professional expertise.
- For persistent problems, always check your user manual first for model-specific troubleshooting steps or handy online videos to guide you.
- Choose a reputable, locally trusted garage door professional—look for certified technicians, transparent pricing, and real customer reviews for safety and peace of mind.
Taking these steps ensures your garage door opener remains safe, reliable, and hassle-free. For detailed walkthroughs and expert tips, explore the full article and trust Ahura Garage Doors: Your Garage Door Experts, Always at Your Service.
Introduction
Hitting your garage remote and — nothing happens?
You’re not alone: nearly 1 in 4 Cedar Park homeowners experience garage door opener hiccups every year, usually at the worst possible moment.
We know how it feels to be stuck, late for work, while your garage door refuses to budge or suddenly decides to close itself on a pile of groceries.
Your garage opener is more than a convenience; it’s a vital part of your home’s security and daily comfort—and when it fails, frustration sets in fast.
The good news? Most opener issues have a quick, manageable fix—often requiring a simple battery swap, a sensor cleaning, or a reset you can handle in minutes.
Still, certain problems need expert hands to keep both your family and your investment safe.
Here’s why this matters today:
- 9% of break-ins happen through the garage—a working, secure opener is peace of mind.
- Modern openers protect loved ones with safety features that should never be bypassed or ignored.
- Knowing when not to DIY means fewer surprises and no avoidable injuries.
In this guide, you’ll find answers to your biggest questions and step-by-step solutions that cover:
- Quick first checks: The fast moves that fix most common opener headaches
- Essential safety tips: What you can do yourself—and what’s strictly for trained pros
- Red flag symptoms: When every homeowner should call in professional help
- Routine maintenance habits: Simple tasks that extend your system’s life and reliability
Our family-owned team at Ahura Garage Doors brings expertise, integrity, and customer-first care to every service in Cedar Park, TX—helping you get back to your day, not stuck in your garage.
Looking for a clear, stress-free way to restore your opener’s performance and protect your home?
Let’s start with the basics: understanding how your garage door opener works and what makes it tick.
Understanding How Garage Door Openers Work
A garage door opener is the silent hero of your daily routine—press a button, and your garage opens like magic. But have you ever wondered what makes that magic happen?
Types of Garage Door Openers
There are four main types of openers, each with unique strengths:
- Chain Drive: Most common and affordable, but can be noisy in operation
- Belt Drive: Runs smoother and quieter—ideal for attached garages
- Screw Drive: Requires less maintenance, but can be sensitive to temperature extremes
- Direct Drive: Ultra-quiet and reliable, with only one moving part
Picture this: a quiet morning, and your garage glides open without a rattle—thanks to the right opener.
Core Components and How They Work
Every opener relies on several essential parts to do the heavy lifting:
- Motor: Powers the system, usually mounted on the ceiling
- Drive Mechanism: Chain, belt, screw, or direct drive to move the door
- Sensors: Infrared safety devices near the floor, stopping the door if something’s in the way
- Controls: The remote in your car, wall switch in your garage, or smart keypad by the door
These components interact with your tracks, rollers, and springs for smooth, safe operation.
Home Security, Convenience, and Safety Features
A working garage opener does more than move a door—it protects your home. National statistics show that 9% of break-ins occur through the garage, underscoring the need for reliable openers.
Modern openers include:
- Auto-reversal mechanisms that stop and reverse the door if something’s detected
- Photo-eye sensors for child and pet safety
- Manual releases for emergencies or power outages
Imagine a quick sensor check prevents a costly accident—small steps add up to big peace of mind.
Why Knowing the Basics Empowers Homeowners
Understanding these basics empowers you to spot issues fast—is the noise coming from the chain, or is a sensor blinking?
When you know your system:
- Troubleshooting becomes less stressful and more effective
- You’ll know when a simple battery swap or sensor cleaning will fix the issue
- You’ll recognize when it’s time to call Ahura Garage Doors—the experts trusted by Cedar Park families
A little opener know-how means more confidence and comfort every time you press that button.
Essential Safety and Preparation Before Troubleshooting
Safety comes first—always. Before you reach for any tools, it’s crucial to power down your garage door opener. Unplug the opener or switch off its circuit breaker to eliminate the risk of electrical shock while working.
If your garage door uses tensioned springs or cables, avoid hands-on repair. These components are under high force and can cause serious injury if handled incorrectly. “Don’t risk a hospital visit for a DIY fix—springs and cables are a professional’s job.”
When To DIY and When To Call a Professional
Most basic troubleshooting is safe for homeowners, but certain repairs should always be left to trained technicians. Call a professional if you:
- Suspect issues with high-tension springs, cables, or pulleys
- Notice frayed/broken cables or disconnected springs
- Spot significant electrical problems like exposed wires
- Experience repeated circuit breaker trips
A professional service call in Cedar Park, TX typically ranges from $75-$350, depending on the complexity and urgency.
Gather the Right Tools and References
Being prepared can save time and prevent needless frustration. For basic troubleshooting and minor fixes, keep these at hand:
- Flathead and Phillips screwdrivers
- Adjustable wrench
- Pliers
- Clean, soft cloth for sensor cleaning
- Sturdy ladder
Always have your garage door opener’s user manual nearby (printed or digital). “Your manual is your troubleshooting lifeline—model-specific fixes save hours of guesswork.”
Set Up a Safe and Efficient Workspace
A cluttered garage is not just inconvenient—it’s dangerous. Clear objects from the garage doorway, floor, and around the opener mechanism. Good lighting makes spotting loose wires, debris, or sensor misalignment easy.
Picture this: You’re working in a brightly-lit, organized garage—each tool within reach and no tripping hazards in sight. That’s peace of mind, and it translates to confident troubleshooting.
A safe start means a successful fix. Before investigating any opener issue, disconnect the power, gather your tools and manual, and set up a clean work area. Smart preparation ensures your repair session goes smoothly—and keeps you one step ahead of surprises.
Step-by-Step Basic Troubleshooting Process
Initial System Checks
Before diving into repairs, the simplest fixes often solve the problem.
Start by confirming your garage door opener is plugged in—an unplugged or tripped outlet is a top cause for door failures in Cedar Park homes.
Check the circuit breaker or GFCI outlet for resets.
Test both your wall switch and remote separately:
- Press the wall switch: does the opener respond?
- Try the remote from several distances and locations.
Now, inspect the door itself:
- Ensure the door is physically unobstructed and not locked by a side bolt.
- Watch and listen for any visible errors, like a flashing light or a short beep.
Take 30 seconds to jot down any symptoms—noting whether the wall button or remote behaves differently makes diagnosing easier if you need to call for help.
“Picture this: You press the remote, nothing happens, but the wall switch works—often it’s a battery or signal issue, not a motor failure.”
—
Immediate Fixes for Common Issues
Often, the fastest DIY garage door opener repairs start right here.
Swap in fresh remote batteries, double-checking the install direction.
Gently clean both safety sensors with a soft cloth and realign them until their indicator lights stay solid—90% of ‘door won’t close’ calls in Cedar Park trace back to dusty or misaligned sensors.
Clear any debris or obstacles from the tracks and the area around the sensors.
Inspect and tighten any external wire connections at the wall button and motor unit:
- Look for loose, disconnected, or corroded wires.
- Tighten gently with a screwdriver or call us if you spot visible fraying.
One quick win: “It’s incredible how often a $3 battery or a wiped sensor brings a whole garage door system back to life.”
—
Power and Reset Procedures
If you’ve checked the basics and there’s still no response, it’s time for a system reset.
Identify minor power interruptions—like a power surge—by unplugging the opener for 60 seconds.
Replug it, or use the “Learn” button on the opener motor to reset remotes and keypads (refer to your user manual for model-specific steps).
After each reset, test the wall switch and remote again.
In most models, a basic reset fixes one in four sudden opener issues—giving you a fast, cost-effective “repair” with minimal effort.
—
A clear, methodical troubleshooting process is your first line of defense for garage door issues. Focus on quick, visible checks and common-sense fixes first—most opener failures respond to simple solutions. If these steps don’t resolve your issue, you can approach the next diagnostic stage feeling confident and prepared.
Diagnosing Common Garage Door Opener Problems
Door Will Not Open or Close
If your garage door doesn’t move at all, start with the basics.
- Check for power: Ensure the opener is plugged in and test the outlet with another device.
- Inspect remotes: Replace batteries and confirm they’re installed correctly.
- Sensor alignment: Make sure both safety sensors have lights on and are facing each other.
If the issue persists, it might be a wiring fault or a failed circuit board. For quick isolation:
- Try the wall switch and remote separately.
- If neither works, suspect power or wiring; if only one fails, it’s likely a control issue.
“Power outages and dead batteries are behind nearly 40% of opener failures.”
—
Door Reverses or Will Not Close Completely
A door that reverses partway down or won’t shut often means a sensor problem.
- Clean both sensors with a soft cloth.
- Realign them until both indicator lights glow steady.
- Remove any obstructions from the door’s path and clear the tracks.
If the door still misbehaves, or if the sensor lights flash stubbornly, it’s time for a professional assessment—wiring or logic board issues may be to blame.
Picture this for video: A quick wipe of dusty sensors restoring perfect operation.
—
Wall Button or Wired Switch Issues
If the wall button is unresponsive, test the remote. If the remote works, the button or its wiring is likely the issue.
- Inspect wires for visible damage or looseness.
- Turn off power, unscrew the button, and check connections.
- Swapping in a new switch is often a fast fix.
Don’t continue if wires seem burnt or corroded—professional help is safest here.
—
Remote Control Problems
Remote fails? Start simple:
- Replace batteries and double-check orientation.
- Reprogram remotes/keypads (see your manual’s steps—most openers use a “Learn” button).
- Make sure the opener’s antenna is straight down and not damaged.
- If sporadic response continues, check for radio interference from WiFi devices or neighbor’s remotes (a 2024 trend in suburban areas).
“Nine out of ten remote issues come down to batteries, reprogramming, or interference.”
—
Opener Motor Runs but Door Stays Still
When the motor hums but the door doesn’t budge:
- Examine if the emergency release is disengaged (the red cord may have been pulled).
- Re-engage the trolley and test again.
- Inspect for a broken chain or belt—if you spot slack or a snapped part, call a pro for safe replacement.
—
Unusual Noises or Jerky Operation
Grinding, squeaking, or jerks signal trouble.
- Lubricate all moving metal parts using garage door lubricant (not WD-40)—focus on rollers, hinges, and the chain/belt.
- Check for loose hardware and worn rollers or gears.
Persistent noise means something deeper—don’t ignore grinding or bangs; schedule service fast.
—
Random Door Operation and Security Concerns
Unexpected opening/closing? Common culprits include:
- Radio frequency interference—neighbors’ remotes or new electronics.
- Misprogrammed remotes; reprogram all openers and set unique codes for every remote.
- Upgrade to rolling-code technology for smarter security.
“Secure remotes, change codes, and outsmart the copycats.”
—
Door Moves Unevenly or Is Off-Balance
If the door tilts, sags, or sticks:
- Test balance: With the opener disengaged, lift the door halfway. If it won’t stay, broken springs or misaligned tracks are probable.
- Inspect for forces on one side, worn rollers, or gaps in tracks.
Never attempt to adjust springs yourself—leave high-tension repairs to experts for safety.
—
When in doubt, always reference your manual and remember: Simple checks solve most issues, but safety always comes first. If the fix seems risky or complex, trust a certified local professional—peace of mind and long-term reliability are worth every penny.
Preventive Maintenance to Reduce Future Issues
Picture this: it’s Monday morning, and your garage door opens smoothly—no squeaks, no hesitation. That’s the power of simple, monthly preventive care.
Consistent maintenance can reduce breakdowns by up to 70% and extend your opener’s life well past a decade.
Monthly Safety Sensor & Balance Checks
Start by testing your safety sensors and door balance every month—a habit that takes just minutes and saves major headaches.
Follow this quick checklist:
- Wipe sensor lenses with a soft, dry cloth.
- Make sure sensors are facing each other and indicator lights are steady.
- Wave an object in sensor’s path as the door descends—the door should auto-reverse.
- Pull the emergency release and lift the door halfway; it should stay in place. If not, springs or balance need attention.
“A 60-second sensor check can prevent a costly repair bill.”
Lubrication Schedule for Key Moving Parts
Keep your garage door system running whisper-quiet by lubricating parts every 3-6 months.
Focus on these areas:
- Opener drive (chain, belt, or screw)
- Tracks and rollers
- Hinges and springs
Use a non-silicone, lithium-based spray. Avoid greasing the tracks—dust builds up and causes jams.
Regular lubrication can cut garage door noise by up to 50%.
Seasonal Inspection Tips for Texas Climates
Cedar Park’s heat and occasional cold snaps can stress your opener.
Stay ahead with:
- Checking rubber seals and weather stripping for cracks.
- Inspecting metal parts for rust or stiffness after rain or humidity swings.
- Confirming that all brackets and mounts are tightly fastened.
This routine helps your door stand up to Texas’ wild temperature swings.
Cleaning Sensors, Tracks, and Opener Unit
Dust and spider webs are frequent culprits for false sensor errors.
Make cleaning a habit:
- Wipe sensors and opener unit with a microfiber cloth.
- Use a soft brush or compressed air for hard-to-reach corners.
- Sweep tracks clear of debris—never apply oil here.
Professional Inspections: The Long Game
Even with great DIY care, a yearly expert inspection uncovers hidden wear, prevents costly emergencies, and keeps your warranty strong.
Expect to pay around $75-$150 for a routine tune-up—less than the cost of a single major repair.
“Preventive maintenance is your garage door’s insurance policy.”
When you keep up with these simple steps, your garage door opener works better, lasts longer, and you enjoy total peace of mind every time you press the button.
When to Call an Expert: Recognizing Issues That Need Professional Service
Knowing when to call a professional can save time, protect your garage, and—most importantly—keep your family safe.
Some garage door repairs are not only difficult but extremely hazardous for DIY attempts.
Repairs That Require a Trained Technician
If you notice any of the following issues, reach out to a certified garage door expert immediately:
- Broken or stretched springs (torsion or extension)
- Frayed or detached high-tension cables
- Persistent electrical problems (circuit boards, wiring, or opener motor failures)
- Doors that have come off their tracks completely
- Motor grinding noises paired with no door movement
Attempting these repairs yourself risks serious injury, as garage door springs and cables are under intense tension—responsible for thousands of emergency room visits each year.
Why DIY Can Be Dangerous
Don’t let YouTube fool you—jobs involving high-tension components aren’t worth the risk.
Just picture this: a garage spring snapping unexpectedly, sending parts flying across your garage at over 100 miles per hour.
Electrical troubleshooting also brings hidden risks, like electric shocks or tripping your home’s breakers.
This is a moment for expertise, not experimentation.
Choosing a Reliable Local Expert in Cedar Park
When you need expert help, look for these signs in a trustworthy garage door provider:
- Verified local presence with a strong reputation (read local reviews)
- Full insurance and certification to protect your property
- Clear, honest pricing with no surprise fees—expect averages from $120 for sensor replacements to $350+ for spring repairs in 2025
- Prompt, courteous service—because your safety can’t wait
At Ahura Garage Doors, our Cedar Park team commits to transparent pricing, honest advice, and skilled workmanship in every repair.
Our Safety-First Promise
We believe customers deserve peace of mind and expert results.
Our technicians use industry-best safety protocols and explain every step, ensuring repairs are always handled the right way, the first time.
If your garage door poses any risk—stop, call Ahura Garage Doors, and let Cedar Park’s most trusted experts handle it with care.
Whenever a problem seems big, technical, or dangerous, your next step is simple: call a professional and put your safety first. Reliable repair starts with knowing when to ask for help.
Frequently Asked Questions About Troubleshooting Openers
If your garage door opener is misbehaving, you’re not alone—most issues stem from a handful of causes and can often be handled with quick checks.
Picture this: You’re standing in your Cedar Park driveway, late for work, hitting the remote over and over, but the door just won’t budge.
Start with these most common homeowner questions and actionable fixes.
Why Won’t My Remote Work, Even With New Batteries?
This is the #1 frustration we hear.
- Check that batteries are installed correctly, matching the + and – signs.
- Test your wall button—if it works but the remote doesn’t, try reprogramming your remote (your opener’s manual shows how).
- Make sure nothing is blocking the remote signal or the opener’s antenna.
“90% of unresponsive remotes are a quick fix—batteries, programming, or signal blockage.”
How Do I Reset My Garage Door Opener?
Resetting often solves “phantom” problems.
- Unplug the opener for 1-2 minutes; plug it back in.
- Use the Learn/Program button on the opener motor to reset remotes or keypads.
- Test system response before moving to bigger fixes.
If the issue keeps returning, a faulty circuit board or major wiring problem may require a pro.
My Door Won’t Close—What Should I Check First?
This is usually a sensor issue:
- Gently clean the safety sensors with a soft cloth.
- Make sure both sensor lights are solid (not blinking).
- Remove any object blocking the path, and check tracks for debris.
- If sensors are aligned and glowing, but the door still won’t close, it’s time for expert help.
When Should I Call For Professional Service?
You should call an expert immediately if:
- You see broken springs or loose high-tension cables.
- There’s visible wiring damage or repeated circuit breaker trips.
- The opener makes grinding noises, or the door drops or moves unevenly.
“Don’t risk DIY repairs on springs, cables, or any component under tension—safety first.”
Quick Reference Table: Fast Fixes for Common Issues
| Issue | First DIY Steps |
|——————————-|—————————————————-|
| Remote won’t work | Check batteries, program, antenna |
| Opener clicks/no movement | Test wall button; inspect sensors and lock switch |
| Door reverses or won’t close | Clean/align sensors; clear path |
| Loud noise or jerky motion | Lubricate rollers; inspect for debris |
| Door off-balance | Test manually; call for spring repairs |
Want to dig deeper? Check your user manual for model-specific codes—most major opener brands also offer step-by-step video guides online.
Confident troubleshooting starts with these basics—most garage door headaches have a straightforward fix you can try yourself before reaching out to the pros. For anything involving springs, high voltage, or repeated failures, remember: your safety matters most.
Conclusion
When your garage door opener acts up, a little know-how turns frustration into confidence. By tackling common troubleshooting steps and knowing when to reach out for expert support, you’re empowered to keep your home secure, convenient, and worry-free.
Here’s how you can make the most of your next maintenance moment:
- Always start with the basics: Check power, remotes, and safety sensors for the quickest fixes.
- Set up safe work conditions: Unplug the opener and clear the workspace before inspecting anything.
- Adopt monthly maintenance habits: Wipe sensors, test auto-reverse, and lubricate moving parts to keep your opener reliable.
- Prioritize your safety: Leave any repairs involving springs, cables, or deep electrical work to certified professionals.
- Keep your opener’s manual handy: Quick reference saves you time and prevents guesswork.
Ready to take the next step?
- Try these DIY checks today—even small adjustments can restore smooth operation and peace of mind.
- If an issue feels risky or complex, contact Ahura Garage Doors for expert, safety-first service—your time and wellbeing are worth it.
- Add a 5-minute sensor and balance test to your monthly home care list—preventing problems is always smarter than repairs.
A reliable garage door opener doesn’t just move a door—it protects your home, adds daily convenience, and gives you confidence that everything works as it should. Keep it performing strong with a few minutes of care each month, and trust Cedar Park’s most dedicated experts whenever you need a helping hand.
“The right fix—done safely—means your garage is always ready to welcome you home.”
For more detailed maintenance tips and tool recommendations, check out this Home Depot Garage Door Maintenance Guide for DIY homeowners.
FAQs
1. What is the first step in how to troubleshoot your garage door opener?
Start with the basics: check the power source, replace remote batteries, and inspect your safety sensors for dirt or misalignment. These simple fixes solve most opener issues.
2. Why won’t my garage door close during troubleshooting?
This is almost always caused by misaligned or dirty safety sensors. Clean them, ensure they are aligned, and confirm both LEDs are solid.
3. How do I reset my garage door opener?
Unplug the opener for 60 seconds, plug it back in, then press the “Learn” button to reprogram remotes. If problems persist, schedule a professional inspection through our garage repair services.
4. When should I stop troubleshooting and call a professional?
Contact a licensed technician if you see broken springs, frayed cables, grinding noises, wiring issues, or repeated opener failures. These are high-risk repairs.
5. Can I troubleshoot my garage door opener without tools?
Yes—many common issues like remote reprogramming, battery replacement, and sensor cleaning require no tools at all.
If your garage door still won’t open smoothly after trying these steps, it may be time for a professional inspection. Explore our full range of expert services on our Garage Door Repair Service page to schedule reliable maintenance or repair.
Garage Doors
Ahura brothers services LLC
Your Trusted Garage Door Experts in Austin Texas
